PengX3 Tutorial
본 매뉴얼에서는 UXEN3에서 uxencli를 이용해 VM을 생성하는 과정을 설명합니다.
1. UXEN3 설치
PengX3 install 문서 참고
2. PostgreSQL 설치 및 설정
UXEN3에서 PostgreSQL를 사용하는 목적은 다음과 같습니다.
- VM(Virtual Machine), PM(Physical Machine), interface 정보를 저장
- VM, PM을 통합
2-(1). PostgreSQL 설치
/opt 디렉토리에 postgresql-9.4_9.4.6-0+deb8u1_amd64.deb 파일이 있습니다.
아래 명령으로 postgresql을 설치합니다.
# dpkg -i postgresql-9.4_9.4.6-0+deb8u1_amd64.deb
2-(2). PostgreSQL 설정
1) Local Address 수정
netstat -nltp | grep postgres을 입력하여 PostgreSQL(tcp 5432 포트를 사용함)의 Local Address를 확인합니다. 아래와 같이 127.0.0.1로 설정되어 있다면, Local Address를 0.0.0.0으로 수정해야 합니다.
# netstat -nltp | grep postgres
tcp        0      0 127.0.0.1:5432          0.0.0.0:*               LISTEN      2881/postgres
tcp6       0      0 ::1:5432                :::*                    LISTEN      2881/postgres
| ~을 | ~로 수정 |
|---|---|
| 127.0.0.1 | 0.0.0.0 |
| Local machine에 127.0.0.1 접속만 허용함 | Local machine에 모든 ip의 접속을 허용함 |
표 1 127.0.0.1과 0.0.0.0 비교
이제 /etc/postgresql/9.4/main/postgresql.conf를 열어 listen_address를 * (Asterisk)로 변경합니다.
- #listen_addresses = 'localhost'
+ listen_addresses = '*'
postgresql.conf를 저장한 뒤 PostgreSQL을 재시작합니다.
# systemctl restart postgresql
아래와 같이 PostgreSQL의 Local Address가 0.0.0.0으로 변경되었습니다.
root@cartor:/etc/postgresql/9.4/main# netstat -nltp | grep postgres
- tcp        0      0 127.0.0.1:5432          0.0.0.0:*               LISTEN      2881/postgres
+ tcp        0      0 0.0.0.0:5432            0.0.0.0:*               LISTEN      3040/postgres
2) PostgreSQL 계정 생성
PostgreSQL 접속 방법은 아래와 같이 postgres 사용자로 전환한 뒤 psql 명령어를 입력합니다.
# su postgres
$ psql
psql (9.4.5, server 9.4.6)
Type "help" for help.

postgres=#
psql에 접속한 상태에서 아래 명령을 입력합니다.
postgres=# create user uxenapi with password 'uxenapi';
CREATE ROLE
3) Database 생성
psql에 접속한 상태에서 아래 명령을 입력합니다.
postgres=# create database uxenapi;
CREATE DATABASE
PostgreSQL의 전체 데이터베이스를 확인합니다.
postgres=# \l
                                  List of databases
   Name    |  Owner   | Encoding |   Collate   |    Ctype    |   Access privileges
-----------+----------+----------+-------------+-------------+-----------------------
 postgres  | postgres | UTF8     | ko_KR.UTF-8 | ko_KR.UTF-8 |
 template0 | postgres | UTF8     | ko_KR.UTF-8 | ko_KR.UTF-8 | =c/postgres          +
           |          |          |             |             | postgres=CTc/postgres
 template1 | postgres | UTF8     | ko_KR.UTF-8 | ko_KR.UTF-8 | =c/postgres          +
           |          |          |             |             | postgres=CTc/postgres
 uxenapi   | postgres | UTF8     | ko_KR.UTF-8 | ko_KR.UTF-8 |
(4 rows)
postgres=# \list
                                  List of databases
   Name    |  Owner   | Encoding |   Collate   |    Ctype    |   Access privileges
-----------+----------+----------+-------------+-------------+-----------------------
 postgres  | postgres | UTF8     | ko_KR.UTF-8 | ko_KR.UTF-8 |
 template0 | postgres | UTF8     | ko_KR.UTF-8 | ko_KR.UTF-8 | =c/postgres          +
           |          |          |             |             | postgres=CTc/postgres
 template1 | postgres | UTF8     | ko_KR.UTF-8 | ko_KR.UTF-8 | =c/postgres          +
           |          |          |             |             | postgres=CTc/postgres
 uxenapi   | postgres | UTF8     | ko_KR.UTF-8 | ko_KR.UTF-8 |
(4 rows)
4) 권한 설정
사용자(uxenapi)에게 Database(uxenapi)의 모든 테이블에 대한 권한을 부여합니다.
postgres=# grant all privileges on database uxenapi to uxenapi
5) PostgreSQL 접속
psql -h localhost -U uxenapi -W을 입력하여 psql에 접속합니다. 비밀번호는 uxenapi입니다.
# psql -h localhost -U uxenapi -W
Password for user uxenapi:
psql (9.4.5, server 9.4.6)
SSL connection (protocol: TLSv1.2, cipher: ECDHE-RSA-AES256-GCM-SHA384, bits: 256, compression: off)
Type "help" for help.

uxenapi=>
| 옵션 | 의미 |
|---|---|
| -h | hostname |
| -U | username |
| -W | password |
표 2. psql 옵션 설명
3. uxenapi 설치
# dpkg -i /opt/uxenapi.deb
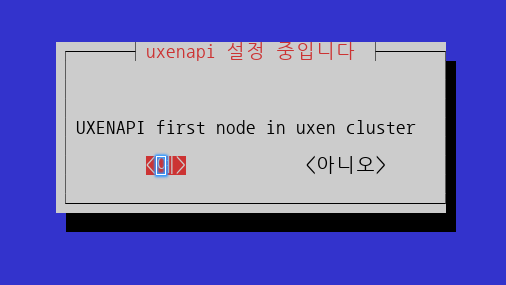
그림 1.
본 매뉴얼에서는 로컬에 설치된 DB 서버의 주소를 입력했습니다.
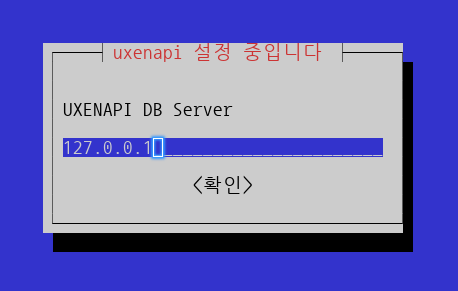
그림 2. DB 서버 주소 입력

그림 3. DB 이름 입력
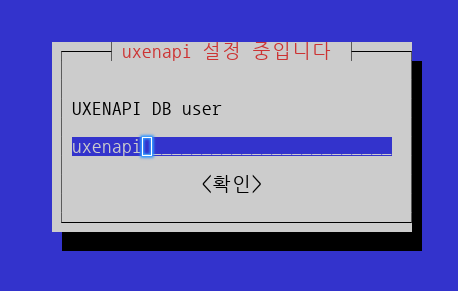
그림 4. DB의 사용자 이름 입력
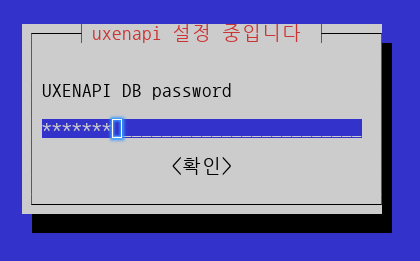
그림 5. DB 비밀번호 입력
그림 5까지 작업이 완료되면 source ~/.bashrc 명령을 실행합니다. 이 명령은 uxencli의 실행 경로를 지정합니다.
# source ~/.bashrc
~/.bashrc에는 UXEN3에 관련된 2줄의 명령어가 추가되어 있습니다.
(..생략..)
export PATH=$PATH:/opt/uxen3/script
source /etc/bash_completion.d/uxencli #자동 완성 기능. (i.e. UUID 자동 완성)

**uxencli: command not found가 발생하는 경우**

만약 source ~/.bashrc 명령을 실행하지 않고 uxencli를 입력하면 아래와
같은 메시지가 출력될 것 입니다.
# uxencli
-bash: uxencli: command not found

**uxenapi DB 설정 정보**

**그림 2 ~ 그림 5**\ 에서 설정한 DB 정보는
/opt/uxen3/settings/production.py에 저장됩니다.
DATABASES = {
    'default': {
        'ENGINE': 'django.db.backends.postgresql_psycopg2',
        'HOST':'127.0.0.1',
        'NAME':'uxenapi',
        'USER':'uxenapi',
        'PASSWORD':'uxenapi',
    },
}
uxencli –version을 입력했을 때 uxencli의 버전이 출력된다면 uxencli는 제대로 설치된 것 입니다.
(고객님의 uxenapi 버전과 매뉴얼의 uxenapi 버전은 다를 수 있습니다.)
# uxencli --version
uxenapi 3.1.7
4. lv 디스크 생성
storlink로 LVM이 아닌 Local disk를 사용할 경우에는 이 단계를 건너 뛰고 “5-(1). storlink 추가의 Local disk를 이용해 storlink 사용할 경우”로 이동하세요.
fdisk -l 명령으로 LVM 파티션을 확인합니다.
# fdisk -l

Disk /dev/sda: 298.1 GiB, 320072933376 bytes, 625142448 sectors
Units: sectors of 1 * 512 = 512 bytes
Sector size (logical/physical): 512 bytes / 512 bytes
I/O size (minimum/optimal): 512 bytes / 512 bytes
Disklabel type: dos
Disk identifier: 0x0000fbc7

Device     Boot     Start       End   Sectors   Size Id Type
/dev/sda1            2048   1953791   1951744   953M 82 Linux swap / Solaris
/dev/sda2  *      1953792 429883391 427929600 204.1G 83 Linux
/dev/sda3       429883392 625141759 195258368  93.1G 8e Linux LVM
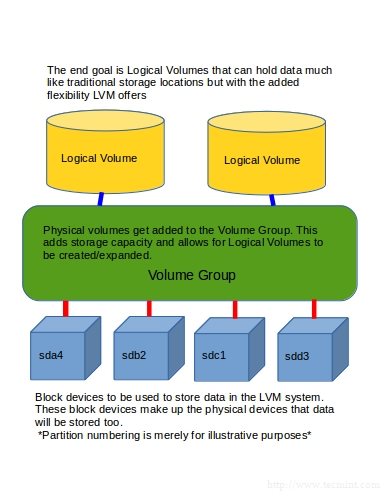
그림 6. PV, VG, LV의 관계
/dev/sda3을 LVM으로 사용하기 위해 초기화합니다.
# pvcreate /dev/sda3
  Physical volume "/dev/sda3" successfully created
Volume group을 생성합니다. 본 매뉴얼에서는 Volume group의 이름을 data로 사용했습니다.
# vgcreate data /dev/sda3
  Volume group "data" successfully created
Volume group(data)에서 logical volume을 생성합니다.
# vgcreate data /dev/sda3
  Volume group "data" successfully created
5. storlink
storlink를 생성해야 VM을 생성할 수 있습니다.
uxencli storlink-add 명령의 사용 방법은 다음과 같습니다.
uxencli storlink-add [OPTIONS] NAME LINK DESC TYPE LEVEL SHARED
5-(1). storlink 추가
LVM을 이용해 storlink를 사용할 경우
# uxencli storlink-add local_lvm1 /dev/data "local lvm" lo bl false
Success
생성된 storlink 확인
# uxencli storlink-list
ID NAME                 LINK                                 TYPE LEVEL SHARED FREE       SIZE
3  local_lvm1           /dev/data                            LO   BL    0      85100      95340
Local disk를 이용해 storlink를 사용할 경우
# uxencli storlink-add local_disk_vm /data "local VM" lo fl false
Success
생성된 storlink 확인
# uxencli storlink-list
ID NAME                 LINK                                 TYPE LEVEL SHARED FREE       SIZE
1  local_disk_vm        /data                                LO   FL    0      294578     294611
5-(2). GVM
1) storlink 생성
GVM 이미지로 사용할 storlink를 생성합니다.
# uxencli storlink-add local_data_gvm /data/gvm "Local data for gvm" lo fl false
Success
uxencli gvm-list를 입력하면 위 명령으로 생성된 storlink를 확인할 수 있습니다.
# uxencli storlink-list
  ID NAME                 LINK                                 TYPE LEVEL SHARED FREE       SIZE
  3  local_lvm1           /dev/data                            LO   BL    0      85100      95340
+ 4  local_data_gvm       /data/gvm                            LO   FL    0      201516     205543
2) GVM 생성
GVM으로 사용할 qcow2 파일을 /data/gvm 디렉토리에 복사합니다. (파일 복사 명령은 생략)
# ls -lh
합계 9.3G
-rw-r--r-- 1 root root 9.3G  8월  3 14:54 debian8.4.qcow2
qcow2 형식의 파일 이름을 UUID로 바꿉니다. (mv debian8.4.qcow2 uuidgen) uuidgen 명령어는 uuid를 생성합니다.
# mv debian8.4.qcow2 `uuidgen`
# ls
488deb3b-8cb0-4fcc-af80-73fe028a594a
아래 명령으로 Debian 8.4(488deb3b-8cb0-4fcc-af80-73fe028a594a -> GVM으로 사용할 디스크 UUID)를 test_gvm1이란 이름으로 GVM(68fafd8a-3677-46ab-a782-0f4844bbaa55)을 생성합니다.
# uxencli gvm-add test_gvm1 debian x64 "Debian 8.4" 4 488deb3b-8cb0-4fcc-af80-73fe028a594a qcow2
Success
uxencli gvm-list 명령으로 생성된 GVM을 확인합니다.
# uxencli gvm-list
  UUID                                 NAME         SIZE   OS           ARCH
+ 68fafd8a-3677-46ab-a782-0f4844bbaa55 test_gvm1    10240  DEBIAN       X64
이제 생성된 GVM(68fafd8a-3677-46ab-a782-0f4844bbaa55)을 기반으로 VM을 생성할 차례입니다.
6. VM
GVM(68fafd8a-3677-46ab-a782-0f4844bbaa55)을 기반으로 VM을 생성합니다.
6-(1). VM 생성
uxencli vm-add 명령을 사용해서 VM을 생성합니다.
uxencli vm-add test_vm1 68fafd8a-3677-46ab-a782-0f4844bbaa55 3 1 1024 1024 test_vm1 xenbr0

Success
6-(2). VM 생성 확인
uxencli vm-list 명령으로 생성된 VM 확인합니다.
# uxencli vm-list
  UUID                                 NAME         vCPU MEM    STATUS     PM
+ 0d7f9188-cdad-42f7-861d-a631ebb11ea4 test_vm1     1    1024   SHUTDOWN   -
6-(3). VM 실행
test_vm1(0d7f9188-cdad-42f7-861d-a631ebb11ea4)은 SHUTDOWN 상태입니다. uxencli vm-start 명령으로 test_vm1을 실행합니다.
# uxencli vm-start 0d7f9188-cdad-42f7-861d-a631ebb11ea4
Success
6-(4). VM 접속
VM의 접속 정보(VNC의 port, password)를 알기 위해서 uxencli vm-info 명령을 사용합니다.
# uxencli vm-info 0d7f9188-cdad-42f7-861d-a631ebb11ea4
UUID            : 0d7f9188-cdad-42f7-861d-a631ebb11ea4
Name            : test_vm1
Cpu             : 1
Maxmem          : 1024
Memory          : 1024
OS              : DEBIAN
OS Arch         : X64
State           : RUNNING
GVM             : 68fafd8a-3677-46ab-a782-0f4844bbaa55
Created         : 2016-08-03T06:23:14.169214Z
Recent Booted   : 2016-08-03T06:33:39.535826Z
Networks        : [ifname] [mac]
                  xenbr0   00:16:3E:AF:3D:3A
+ VNC Port        : 5900
+ VNC Password    : uenjqd67w2ve
vnc 접속 프로그램(i.e. vncviewer)을 통해 UXEN3가 설치된 서버의 5900 포트로 접속합니다.(i.e. 192.168.0.26:5800) vnc 접속 비밀번호는 uenjqd67w2ve를 입니다.
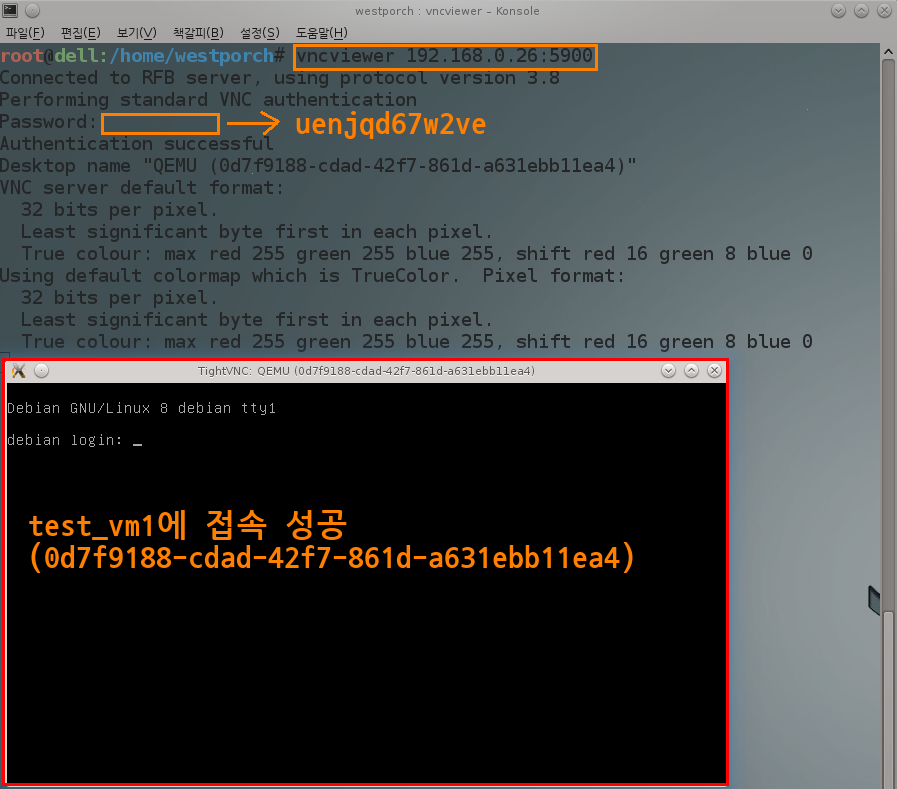
그림 7. vncviewer로 test_vm1에 접속한 모습