Bacula 설치부터 운영까지
개요
Bacula 는 C++ 프로그래밍 언어로 개발되고 GNU(General Public License) 버전 2.0 오픈 소스 네트워크 기반 백업 프로그램이다. ᅟBacula 라는 이름은 Backup 과 Dracula 에 혼합어이다. 드라큘라처럼 데이터를 흡혈하듯 백업한다는 재미난 이름이다.
Bacula 의 특징으로는 다음과 같다.
- 쉬운 설치 및 설정
- 다양한 백업 장치 지원 (하드디스크, ᅟLTO 1-5 테이프 장치 등등)
- 다양한 모니터링툴 지원
- 증분, 차등, 차등 증분, 변경분, 가상 백업, 백업 주기, 압축 프로토콜 등 다양한 백업 방식 지원
- 백업 전후 실시할 명령어 지정이 가능
- 네트워크로 백업되는 데이터의 암호화를 위한 다양한 옵션 (MD5, SHA, TLS, CRAM-MD5 등등) 지원
- 데이터 압축 전송
- 네트워크 bandwidth 제한 가능
Bacula 구조
Bacula 구성 요소
아래 구조를 정확히 이해해야 Bacula 백업 관리 및 운영이 가능하다. 하지만 처음 구조를 살펴 보면 이해가 잘 안가고 복잡해 보일 수 있다. Bacula 는 ᅟDirector, Console, File, Storage 및 Monitor 5가지 주요 서비스와 ᅟCatalog 라는 하나의 DB 로 구성되며 이 서비스들은 얼마든지 확장이 가능하다.
출처 : http://www.bacula.org/7.9.x-manuals/en/main/What_is_Bacula.html
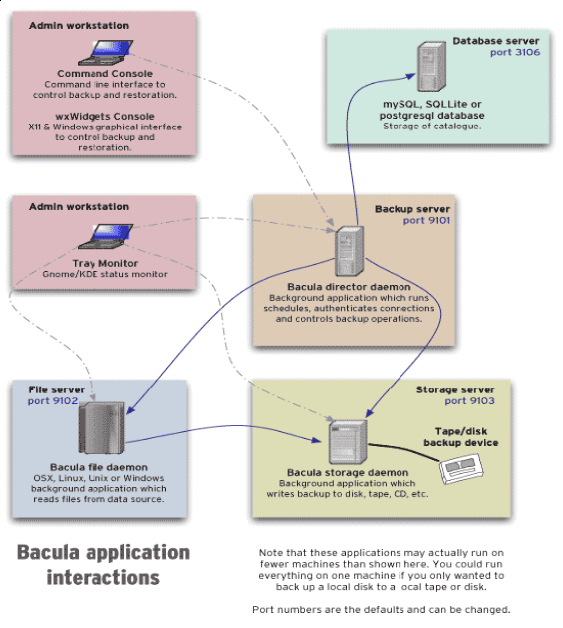
ᅟBacula 는 Catalog 라고 백엔드 서비스가 존재하는데 백업에 관련된 모든 정보를 Catalog 라는 DB에 저장하여 관리한다. 공식적으로 mysql, postgresql, sqlite, sqlite3 를 지원하며 실무용으로 사용한다면 sqlite 는 권장하지 않는다. 이로 인하여 ᅟBacula 의 Catalog 에 대한 백업도 중요시 되는게 사실이다. 그래서 자체적으로 Catalog 를 백업하는 스크립트가 존재하며 DB가 손상되었을 경우 수동으로 복원이 가능한 CLI 툴을 이용하여 복원이 가능하다.
DB 를 제외한 서비스에 대하여 알아보자.
Bacula Director
bacula direcotr 서비스는 client 들과 통신하며 모든 백업, 복원, 확인 및 기록하는 작업을 감독하는 프로그램이다. default 포트는 9101 이다.
Bacula Console
bacula console 서비스는 ᅟbacula direcor 와 통신하여 명령을 수행할 수 있다. bacula console 에는 텍스트 기반 콘솔 인터페이스, qt 기반 인터페이스 및 wxWidgets 그래픽 인터페이스 세가지 버전이 있다. 대체적으로 많이 사용하는 인터페이스는 쉘에서 사용하는 텍스트 기반 콘솔 인터페이스이다.
Bacula File
bacula file 서비스(클라이언트 프로그램)는 백업 할 클라이언트에 설치해야 하는 프로그램이다. bacula director 서비스가 백업, 복원과 같은 작업을 요청시 파일 속성 정보와 데이터를 전달하는 역할을 한다. unix/linux 외에도 windows file 데몬이 있다. windows server 및 desktop 버전 에도 설치가 가능하다. default 포트는 9102 이다.
Bacula Storage
bacula storage 서비스는 파일 속성 및 데이터를 물리적인 백업 미디어 또는 볼륨에 저장하는 프로그램이다. 백업 미디어 또는 볼륨을 읽고 쓰는 역할을 한다. default 포트는 9103 이다.
Bacula Monitor
bacula monitor 서비스는 관리자 또는 사용자가 ᅟbacula 의 주요 데몬 상태를 볼 수 있게 해주는 프로그램이다. 현재 GNOME, KDE 또는 FreeDesktop.org 시스템 트레이 표준을 지원하는 모든 window manager 와 함께 작동하는 GTK + 버전만 사용할 수 있다.
지원 OS
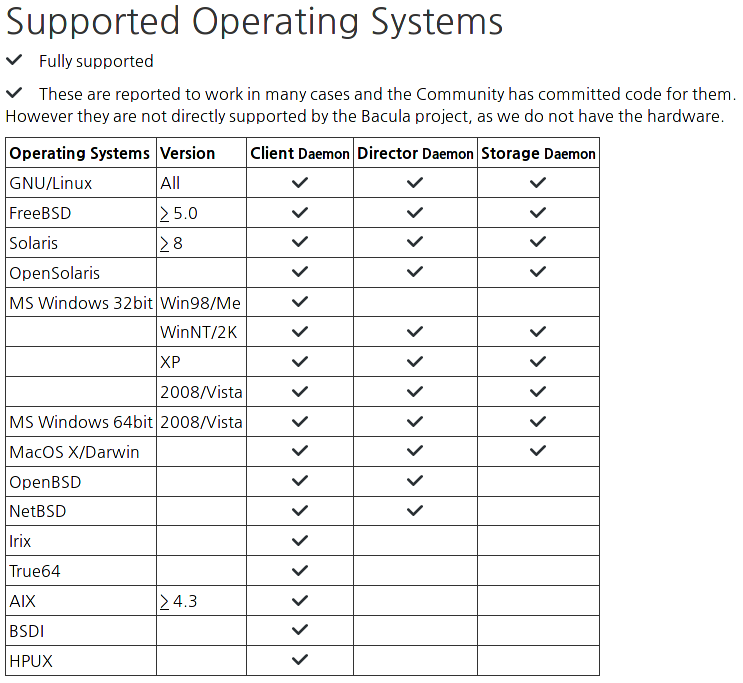
Bacula는 BSD, Linux, Mac OS X, Unix 및 Windows와 같은 가장 널리 사용되는 플랫폼을 지원한다. client daemon의 경우 거의 모든 os 에 지원이 가능하다. 지속적으로 업그레이드가 이루어지고 있으며 아래 기재되어 있지 않은 window destkop 버전에서도 client daemon을 설치하여 백업이 가능하다.
bacula 홈페이지를 참조하였다. 출처 : https://blog.bacula.org/what-is-bacula/supported-operating-systems/
Bacula 설치(on Debian Stretch)
최근 debian stretch 가 release 되어 최신 버전에서 설치를 진행하였다. 현재 bacula 에 stable 최신 버전은 7.4 버전이다. bacula 설치 방법은 소스를 이용하여 컴파일하는 방법과 apt package install 유틸리티를 이용하여 설치하는 방법이 있다.
본 매뉴얼은 아래 가상서버의 구성으로 진행하였다. 최소 2대 이상의 서버를 준비하여 1대는 director, storage, monitor 서비스를 담당하고 1대는 백업 할 clientᅟ 서버로 준비하여 시험을 하기를 바란다.ᅟ windows 와 mac 은 부득이하게 제외하였다. 설치 할 client 프로그램과 방법만 다를 뿐 설정은 linux 와 동일하다.
| 서비스 | Hostname | OS | IP |
|---|---|---|---|
| Bacula Direcotor | bacula | Debian Stretch | 192.168.0.190 |
| Bacula Storage | bacula | Debian Stretch | 192.168.0.190 |
| Bacula Console | bacula | Debian Stretch | 192.168.0.190 |
| Bacula Client | bacula | Debian Stretch | 192.168.0.190 |
| Bacula Client | client1 | Debian Stretch | 192.168.0.191 |
| Bacula Client | client2 | Debian Stretch | 192.168.0.192 |
Bacula Server(Direcotr, Storage, Console)
위에서 소개한바와 같이 bacula 에는 역할이 다른 다양한 프로그램이 있고 백업을 위해서는 필수 프로그램이 구동되어야 한다. 클라이언트는 ᅟbacula file(bacula-fd) 프로그램만 구동이 되면 되지만 서버의 경우 bacula director(bacula-director), bacula storage(bacula-sd), bacula console(bconsole) 프로그램이 모두 정상적으로 구동되어야 백업 및 복원을 할 수 있다.
apt 를 이용하여 설치하는 방법으로 진행하였다. stretch 에서는 bacula 최신 버전(7.4)이 stable 버전으로 확인된다. bacula 에서는 다양한 db(mysql, postgresql, sqlite, sqlite3)를 지원한다. 본 매뉴얼에서는 postgresql 을 사용하였다.
# apt search bacula
# apt update
# apt install bacula-client bacula-common bacula-common-pgsql bacula-console bacula-director bacula-director-pgsql bacula-fd bacula-sd
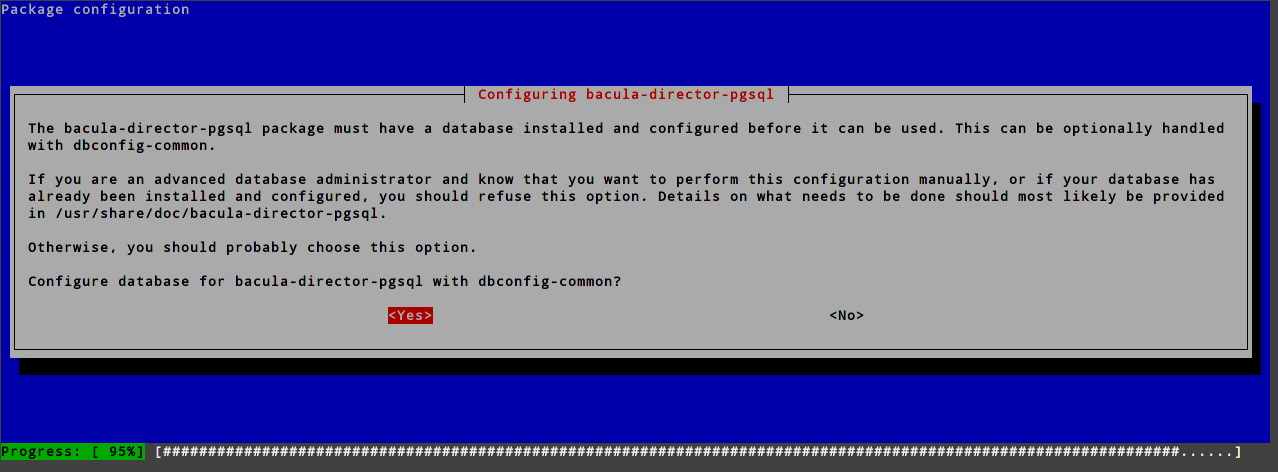
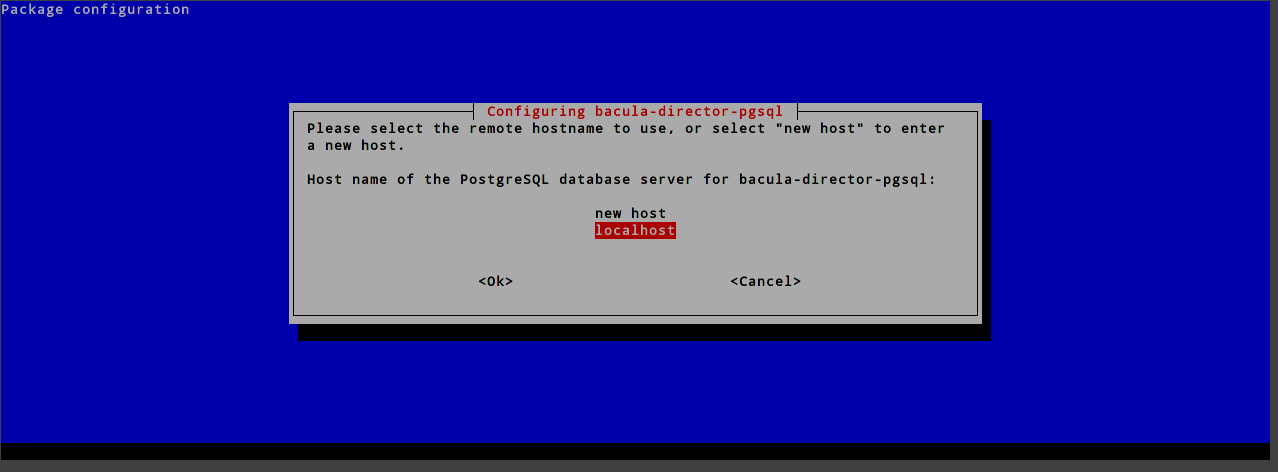
ᅟbacula 를 사용하기 위해서는 db를 반드시 설치해야 하고 bacula db 를 설정해야만한다. 설치 과정 중 친절하게 ᅟ자동으로 설정을 해주겠다고 물어본다. yes 를 클릭하고 db가 설치 되 있는 host, 여기서는 localhost를 선택하고 db 패스워드를 입력한다.
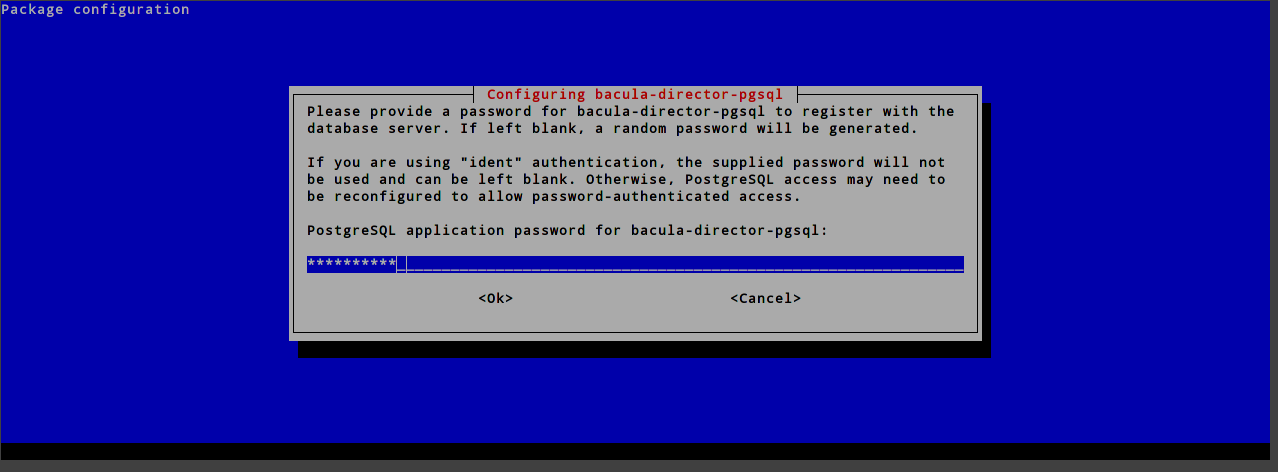
설치가 끝나면 db 에 접속하여 설정이 잘 되었는지 확인해 본다. 아래와 같이 table 이 추가되었다면 정상적으로 db 설정이 잘 된 것이다.
# psql -h localhost -U bacula -d bacula
Password for user bacula:
psql (9.6.3)
SSL connection (protocol: TLSv1.2, cipher: ECDHE-RSA-AES256-GCM-SHA384, bits: 256, compression: off)
Type "help" for help.

bacula=> \dt
            List of relations
 Schema |      Name      | Type  | Owner
--------+----------------+-------+--------
 public | basefiles      | table | bacula
 public | cdimages       | table | bacula
 public | client         | table | bacula
 public | counters       | table | bacula
 public | device         | table | bacula
 public | file           | table | bacula
 public | filename       | table | bacula
 public | fileset        | table | bacula
 public | job            | table | bacula
 public | jobhisto       | table | bacula
 public | jobmedia       | table | bacula
 public | location       | table | bacula
 public | locationlog    | table | bacula
 public | log            | table | bacula
 public | media          | table | bacula
 public | mediatype      | table | bacula
 public | path           | table | bacula
 public | pathhierarchy  | table | bacula
 public | pathvisibility | table | bacula
 public | pool           | table | bacula
 public | restoreobject  | table | bacula
 public | snapshot       | table | bacula
 public | status         | table | bacula
 public | storage        | table | bacula
 public | unsavedfiles   | table | bacula
 public | version        | table | bacula
(26 rows)

bacula=>
ᅟBacula Client
백업 대상 클라이언트에는 bacula file(bacula-fd) 프로그램만 구동이 되면 된다. 마찬가지로 apt 를 이용하여 설치한다.
# apt update
# apt install bacula-fd
Bacula 설정
Settings Bacula Director
ᅟBacula Client 설정 방법은 매우 간단하기에 Director -> Storage -> Client 순서로 설정을 진행해 본다. 위에서 설명한바와 같이 Director 서비스는 감독관 같은 개념으로서 백업에 관한 명령을 수행하는 서비스로 가장 중요한 서비스이다.
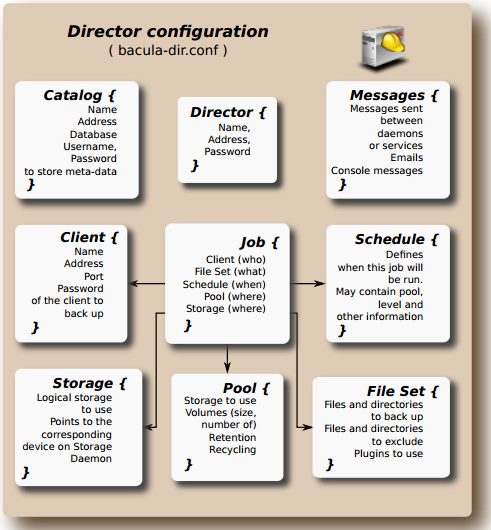
각 섹션에 대하여 살펴보자.
Director {}
Direcotr 데몬의 기본적인 정보를 설정하는 부분이다. Director 서버 이름과 DirAddress 정보를 입력한다. Direcotr 서버 이름은 Client 설정에서 꼭 필요한 요소이며 동일한 이름이 설정되어야 한다. DirAddress 는 FQDN 또는 ip 주소를 입력한다. 추가로 Maxium Concurrent Jobs 항목이 있는데 최대 동시 작업 수 를 지정하는 항목이다. 한번에 한 서버만 백업이 실행되길 원하거나 서버의 성능에 맞춰 조정하고 싶다면 해당 항목의 숫자를 변경하면 된다.
Director {                            # define myself
  Name = bacula-dir
  DIRport = 9101                # where we listen for UA connections
  QueryFile = "/etc/bacula/scripts/query.sql"
  WorkingDirectory = "/var/lib/bacula"
  PidDirectory = "/run/bacula"
  Maximum Concurrent Jobs = 20
 - Password = "Pzou7xJvjGunHtRkPPtGQw1vQkG_XfTNG"         # Console password
 + Password = “vmffpdlsxprtmxm1!”
  Messages = Daemon
  DirAddress = 127.0.0.1
}
Catalog {}
위에서 설명한 바와 같이 ᅟCatalog 라고 하는 DB 를 사용한다고 하였다. 위 설치 과정으로 설치하였다면 bacula-dir.conf 설정 ᅟ파일에 자동으로 정보가 입력되었을 것이다. 정보가 변경이 되었다면 catalog 섹션에서 정보를 수정하면 된다.
Catalog {
  Name = MyCatalog
  dbname = "bacula"; DB Address = "localhost"; dbuser = "bacula"; dbpassword = "vmffpdlsxprtmxm1!"
}
Messages {}
백업의 성공 혹은 에러 등 job 을 수행한 뒤에 메시지들을 이메일로 보내주는 기능이 있다. Messages 섹션은 Standard, Daemon 2가지 종류로 나뉘는데 Standard 는 job 의 백업 및 복원을 수행시 결과에 대한 메시지를 담당하며 ᅟDaemon 은 Dir, Storage, Client 간의 통신 상태에 대한 메시지를 담당한다. 별도 메일 구성없이 mailcommand 항목에 smtp 서버의 호스트명을 입력하고 mail 항목에 발신자 주소만 수정하면 메시지 발송이 가능하다.
Messages {
  Name = Standard

  - mailcommand = "/usr/sbin/bsmtp -h localhost -f \"\(Bacula\) \<%r\>\" -s \"Bacula: %t %e of %c %l\" %r"
  + mailcommand = "/usr/sbin/bsmtp -h iorchard.co.kr -f \"\(Bacula\) \<%r\>\" -s \"Bacula: %t %e of %c %l\" %r"
  - operatorcommand = "/usr/sbin/bsmtp -h localhost -f \"\(Bacula\) \<%r\>\" -s \"Bacula: Intervention needed for %j\" %r"
  + operatorcommand = "/usr/sbin/bsmtp -h ᅟiorchard.co.kr -f \"\(Bacula\) \<%r\>\" -s \"Bacula: Intervention needed for %j\" %r"
  - mail = root = all, !skipped
  + mail = [email protected] = all, !skipped
  - operator = [email protected] = mount
  + operator = root = mount
  console = all, !skipped, !saved
  append = "/var/log/bacula/bacula.log" = all, !skipped
  catalog = all
}

Messages {
  Name = Daemon
  - mailcommand = "/usr/sbin/bsmtp -h localhost -f \"\(Bacula\) \<%r\>\" -s \"Bacula daemon message\" %r"
  + mailcommand = "/usr/sbin/bsmtp -h iorchard.co.kr -f \"\(Bacula\) \<%r\>\" -s \"Bacula daemon message\" %r"
  - mail = root = all, !skipped
  + mail = [email protected] = all, !skipped
  console = all, !skipped, !saved
  append = "/var/log/bacula/bacula.log" = all, !skipped
}
Storage {}
여기서부터는 ᅟ다양한 옵션을 제공한다. 한가지 핵심은 Storage 섹션은 저장장치를 지정하는 역할을 한다. 아래 Storage 설정을 진행하겠지만 백업 저장 장치를 Stroage 서비스에서 설정하게 되고 해당 Device를 지정하는 Director 에서 Storage 섹션에서 설정하게 된다. Storage 설정과 매치되어야 하는 항목들은 아래와 같다.
Storage {
  - Name = File1
  + Name = Client1
# Do not use "localhost" here
  - Address = localhost                # N.B. Use a fully qualified name here
  + Address = 192.168.0.190                # N.B. Use a fully qualified name here
  SDPort = 9103
  - Password = "MsENe5HdfIbZGSlrCGIJXvhS52-nlo8Hz"
  + Password = "vmffpdlsxprtmxm1!"
  - Device = FileChgr1
  + Device = Client1
  Media Type = File1
  Maximum Concurrent Jobs = 10        # run up to 10 jobs a the same time
}

Storage {
  - Name = File2
  + Name = Client2
# Do not use "localhost" here
  - Address = localhost                # N.B. Use a fully qualified name here
  + Address = 192.168.0.190                # N.B. Use a fully qualified name here
  SDPort = 9103
  Password = "MsENe5HdfIbZGSlrCGIJXvhS52-nlo8Hz"
  Password = "vmffpdlsxprtmx1!"
  - Device = FileChgr2
  + Device = Client2
  Media Type = File2
  Maximum Concurrent Jobs = 10        # run up to 10 jobs a the same time
}
Pool {}
Bacula 는 백업을 저장하는 파일을 tarball 처럼 하나의 파일로 묶고 이것을 테이프 장치처럼 백업을 하게 된다. 파일들은 보안상 내용을 볼 수 없도록 암호화하여 파일로 합쳐지게 되는데 이 파일을 Volume 이라고 부른다. Pool은 이 Volume 을 하나로 묶은 파일이다. 쉽게 생각하면 각각의 Volume이 테이프라고 생각하면 된다.
- Name : Pool 의 이름을 지정한다.
- ᅟPool Type : ᅟdefault 인 Backup 외에 Archive, Cloned Migration, Copy, Save 등 다양한 타입이 있다.
- Recycle : 지정한 주기가 끝나면 처음으로 돌아가는 재활용 주기를 지정한다. 테이프로 생각하면 되감기로 생각하면 된다.
- AutoPrune : 볼륨 내에 주기가 지난 파일들을 자동으로 삭제하는 옵션이다.
- Volume Retension : 볼륨 자체의 주기를 지정한다. 365일(1년) 동안 사용하지 않는 볼륨이 있을시 볼륨을 삭제한다.
- Maximum Volume Bytes : 볼륨의 최대 크기를 지정한다.
- Maximum Voulmes : 볼륨의 최대 개수를 제한한다. 최대 볼륨 50G에 최대 볼륨 개수가 100 이라면 이 Pool 의 최대 사이즈는 50G x 100 = 5TB 이다.
- Storage : Pool 을 저장할 Storage 를 지정한다.
- Label Format : Storage 에 저장되는 Pool 의 이름을 형식에 맞게 자동으로 생성되도록 설정할 수 있다.
Pool {
  - Name = Default
  + Name = Client1
  Pool Type = Backup
  Recycle = yes                       # Bacula can automatically recycle Volumes
  AutoPrune = yes                     # Prune expired volumes
  Volume Retention = 365 days         # one year
  Maximum Volume Bytes = 50G          # Limit Volume size to something reasonable
  Maximum Volumes = 100               # Limit number of Volumes in Pool
  Storage = Client1
}

Pool {
  - Name = File
  + Name = Client2
  Pool Type = Backup
  Recycle = yes                       # Bacula can automatically recycle Volumes
  AutoPrune = yes                     # Prune expired volumes
  Volume Retention = 365 days         # one year
  Maximum Volume Bytes = 50G          # Limit Volume size to something reasonable
  Maximum Volumes = 100               # Limit number of Volumes in Pool
  Storage = Client2
  - Label Format = "Vol-"               # Auto label
  + Label Format = "Client2-"               # Auto label
}
Schedule {}
Backup 스케쥴을 설정한다. 설정이 직관적이기 때문에 간단히 살펴봐도 쉽게 이해할 수 있을 것이다. 여러가지 스케쥴 세트를 만들어 각 서버별로 다양한 스케쥴링 할 수 있다. 몇가지 스케쥴 설정을 보며 설명한다.
아래는 WeeklyCycle 이름의 스케쥴로 3가지 스케쥴이 설정되어 있다.
- 매월 첫째주 일요일 23시 5분 전체 백업
- 매월 둘째주부터 다섯째주까지 일요일 23시 5분 차등 백업
- 매주 월요일부터 토요일 23시 5분 증분 백업
Schedule {
  Name = "WeeklyCycle"
  Run = Full 1st sun at 23:05
  Run = Differential 2nd-5th sun at 23:05
  Run = Incremental mon-sat at 23:05
}
아래는 Full Backup 이름의 스케쥴이다. 위와 같이 하나의 스케쥴에 모든 여러 스케쥴을 설정 할 수 있고 아래와 같이 하나씩 설정하여 목적에 맞는 스케쥴을 설정하여 지정해서 사용할 수 있다.
- 매주 일욜부터 토요일(매일) 23시 10분 전체 백업
Schedule { Name = “Full Backup” Run = Full sun-sat at 23:10 }
FileSet {}
이 섹션은 백업할 client 의 백업 경로를 지정하는 섹션이다. 어떤 경로에 어떤 파일들을 백업할 것인가를 이 섹션에서 설정한다. 아래는 default 설정은 아니지만 설명을 위해 / 파티션을 백업 경로로 설정한 예제로 설명한다.
아래 링크를 참조하여 더 많은 옵션을 확인 할 수 있다. http://www.bacula.org/7.4.x-manuals/en/main/Configuring_Director.html#SECTION001770000000000000000
- Name : File Set 의 이름을 지정한다.
- Include : 백업 작업시 포함되어야 할 내용을 추가한다.
- compression : 파일을 압축한다.
- signature : md5 보다는 속도가 조금 느리지만 md5보다 4바이트 추ᅟ가되어 보안적인 면에서 좋다.
- sparse : default 값은 no 이다. sparse file 을 백업할 경우 유용한 옵션이다.
- file : 백업 경로를 설정한다.
- exclude : 백업시 제외되어야할 경로를 설정한다.
fileSet {
  Name = "Full"
  Include {
    Options {
        compression=GZIP
        signature=SHA1
        Sparse=ᅟno
    }
    file = "/"
    }
    exclude {
    file = "/proc"
    file = "/sys/"
    file = "/selinux"
    file = "/media"
    file = "/mnt"
    file = "/dev"
    file = "/home/mysql"
    file = "/home/svn_back"
    }
}
JobDefs {} / Job {}
백업 및 복원 작업을 수행하는 핵심 섹션이다. JobDefs 는 공통적이거나 중복되는 설정을 하나로 정의하여 설정 할 수 있다. 위에서 설정한 각 섹션에서 필요한 섹션의 이름을 지정하여 설정한다.
JobDefs {
  Name = "DefaultJob"
  Type = Backup
  Level = Incremental
  - Client = bacula-fd
  + Client = client1-fd
  FileSet = "Full Set"
  Schedule = "WeeklyCycle"
  - Storage = File1
  + Storage = Client1
  Messages = Standard
  - Pool = File
  + Pool = Client1
  Write Bootstrap = "/var/lib/bacula/%c.bsr"
}
Client {}
백업할 client의 정보를 설정한다.
Client {
  - Name = bacula-fd
  + Name = client1-fd
  - Address = localhost
  + Address = 192.168.0.191
  FDPort = 9102
  Catalog = MyCatalog
  - Password = "HTj1bTUuybB7jkajzmMhOR78PwXp_UT3R"          # password for FileDaemon
  + Password = "vmffpdlsxprtmxm1!"          # password for FileDaemon
}
Settings Bacula Storage
설정이 까다로운 Director 설정이 끝났다면 Storage 설정을 살펴보자. Storage 설정 파일은 bacula-sd.conf 파일이다. 설치 후 해당 파일을 확인해보면 주석처리된 설정들이 많이 보일 것이다. 테이프 장치 및 여러가지 저장장치에 대한 옵션의 예제들이며 다양한 옵션들을 볼 수 있다. 해당 매뉴얼에서는 가상서버를 이용하여 시험하기에 하드디스크를 이용한 백업으로 설정하였다.
아래 그림을 보면 Direcotr 서비스보다 섹션이 적은 것을 확인 할 수 있다. Storage, Director, Messages 는 ᅟDirecotor 설정과 같이 서비스 서버의 설정 정보를 올바르게 입력하면 된다. Device 섹션에 대해서는 위 Storage 서비스를 소개한 바와 같이 데이터를 물리적인 백업 미디어 또는 볼륨에 저장하기 위하여 저장장치에 대한 설정을 한다.
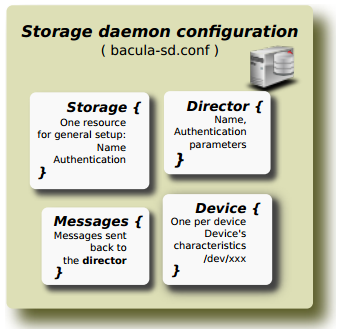
아래는 아주 단순한 Device 설정 예제이다. Storage, Director 섹션에는 서비스에 맞는 정보를 입력하자. Director 서비스의 name 과 password 를 위 Director 설정에서 설정한 정보와 동일하게 입력해야 한다. Storage 섹션에 sdaddress 정보는 loopback 으로 설정하면 안되고 내부 네트워크나 FQDN 또는 ip 를 지정한다. Storage 섹션의 몇가지 옵션을 살펴보자.
- Name : Device 의 이름을 지정한다.
- Mediay Type : 미디어 타입은 2가지이다. File or Tape(LTO-1,LTO-2,LTO-3,LTO-4,LTO-5)
- Archive Deivce : 백업되는 파일이 저장되는 경로를 지정한다.
- LabelMedia : 테이프 장치에서 테이프의 label을 자동으로 인식한다. 하드디스크의 경우 자동으로 장치명을 label 한다.
- Random Access : 하드디스크일 경우 yes, 테이프 장치라면 no 로 설정한다.
- AutomaticMount : 백업 job 마다 저장되는 device 가 다를 경우, 자동으로 장치를 마운트 한다.
- RemovableMedia : 제거 가능한 장치인 지정ᅟ한다. 하드디스크라면 no 로 설정한다.
- AlwaysOpen : 하드디스크일 경우 no, 테이프 장치라면 yes 로 설정한다.ᅠ
Storage {                             # definition of myself
  Name = bacula-sd
  SDPort = 9103                  # Director's port
  WorkingDirectory = "/var/lib/bacula"
  Pid Directory = "/run/bacula"
  Maximum Concurrent Jobs = 20
  - SDAddress = localhost
  + SDAddress = 192.168.0.190
}

Director {
  Name = bacula-dir
  - Password = "Pzou7xJvjGunHtRkPPtGQw1vQkG_XfTNG"
  + Password = "vmffpdlsxprtmxm1!"
}

Device {
  Name = Client1
  Media Type = Client1
  Archive Device = /backup/Client1
  LabelMedia = yes;                   # lets Bacula label unlabeled media
  Random Access = Yes;
  AutomaticMount = yes;               # when device opened, read it
  RemovableMedia = no;
  AlwaysOpen = no;
  Maximum Concurrent Jobs = 5
}

Device {
  Name = Client2
  Media Type = Client2
  Archive Device = /backup/Client2
  LabelMedia = yes;                   # lets Bacula label unlabeled media
  Random Access = Yes;
  AutomaticMount = yes;               # when device opened, read it
  RemovableMedia = no;
  AlwaysOpen = no;
  Maximum Concurrent Jobs = 5
}

Messages {
  Name = Standard
  director = bacula-dir = all
}
설정이 완료되었다면 위 설정에서 ᅟ지정한 백업 저장 경로를 생성하고 소유권을 변경하고 Storage 서비스를 재시작하고 설정한 ip 정보로 포트가 해당 서비스로 시작되었는지 확인한다.
# ᅟmkdir -p /backup/Client1
# ᅟmkdir -p /backup/Client2
# chown bacula:bacula -R /backup
# systemctl restart bacula-sd
# ss -ltp | grep bacula-sd
Settings Bacula Client
마지막으로 ᅟClient 서비스의 설정을 진행하고 백업 및 복원을 시험해보자. Director 와 Storage 설정을 진행하였다면 Client 설정은 정말 쉽다. 간단히 설명하자면 Director 섹션은 위 Stroage 설정과 같이 Director 서비스의 설정과 동일하게 설정한다. 이 부분은 Director 서비스가 Client 서비스에 접속을 요청할 때 패스워드를 인증하는 부분이다.두번째 FileDaemon 섹션은 Client 서비스가 동작하는 설정이다. Client 서버의 FQDN 또는 ip 정보를 입력하자. 마지막 세번째 Messages 섹션은 작업 메시지를 처리하는 부분으로 메시지 작업을 수행하는 director 서비스를 지정한다.
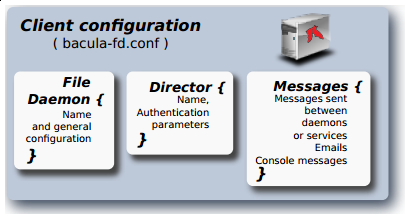
Director {
  Name = bacula-dir
  - Password = "vmffpdlsxprtmxm1!"
  + Password = "vmffpdlsxprtmxm1!"
}

FileDaemon {                          # this is me
  Name = client1-fd
  FDport = 9102                  # where we listen for the director
  WorkingDirectory = /var/lib/bacula
  Pid Directory = /run/bacula
  Maximum Concurrent Jobs = 20
  Plugin Directory = /usr/lib/bacula
  - FDAddress = localhost
  + FDAddress = 192.168.0.191
}

# Send all messages except skipped files back to Director
Messages {
  Name = Standard
  director = bacula-dir = all, !skipped, !restored
}
참고로 패스워드에 대한 설명으로 ᅟᅟos 상에 ᅟbacula 패스워드는 별도 암호화를 지원하지 않는다. 각 서비스별 통신하는 과정에서는 암호화 되어져 통신이 이루어지지만 osᅟ 상에는 plain text 로 패스워드를 설정해야 한다. 또한 특별한 규칙은 정해져있지 않다.
Client 서비스 설정이 완료되었다면 서비스를 재시작하고 설정한 ip 정보로 포트가 해당 서비스로 시작되었는지 확인한다.
# systemctl restart bacula-fd
# ss -ltp | grep bacula-fd
Settings Bacula Console
bacula console 은 위에서 소개한 바와 같이 세가지 버전에 콘솔 인터페이스가 있다. cli 에서는 bconsole 이라는 텍스트 기반 콘솔을 사용한다. bconsole.conf 에 bacula director 프로그램 정보를 수정하여 콘솔에 접속 할 수 있다.
# vi /etc/bacula/bconsole.conf
...
Director {
  Name = bacula-dir
  DIRport = 9101
  address = localhost
 - Password = "wUlW_BhnSTqYuwN3tDblNprLpAcs73EMt"
 + Password = “vmffpdlsxprtmxm1!”
}
Bacula 운영
ᅟ위와 같이 bacula 를 설치하고 설정까지 완료가 되었다면 백업 및 복원 시험을 하여 문제가 없는지 점검한다. bacula console(bconsole)을 이용하여 수동 백업으로 시험해본다. 수동 백업은 Dirctor 서비스의 설정 파일(baculs-dir.conf)에 설정한 내용을 토대로 수동으로 백업을 진행한다. 자동 백업은 스케쥴 섹션에 설정 맞춰 진행이 될 것이다.
Bacula Console
백업 및 복원 시험을 진행하였다. ᅟbacula console 은 bacula director 와 연결하여 작업을 수행하게 된다. bacula 에서 제공하는 gui 툴이 있지만 cli 를 이용하여 시험한다. gui 에 대해서는 추가로 소개를 하겠다. bacula console은 bacula director 라는 감독에 지시로 동작하기에 관리자는 bacula director 설정을 모두 이해하고 있어야 한다.
위 설치 과정에서 bacula-console 패키지를 설치하였기에 bconsole.conf 설정 파일에 Director 서비스의 설정을 올바르게 수정하고 bconsole 을 실행하자.
Director {
  Name = bacula-dir
  DIRport = 9101
  address = localhost
  - Password = "wUlW_BhnSTqYuwN3tDblNprLpAcs73EMt"
  + Password = "vmffpdlsxprtmxm1!"
}
설정 파일에 문제가 없다면 Director 서버와 연결이 성공하게 되고 다양한 작업을 수행 할 수 있다. help 를 입력하여 수행 가능한 command 를 살펴보자.
# bconsole
Connecting to Director localhost:9101
1000 OK: 102 bacula-dir Version: 7.4.4 (20 September 2016)
Enter a period to cancel a command.
*
*help
  Command       Description
  =======       ===========
  add           Add media to a pool
  autodisplay   Autodisplay console messages
  automount     Automount after label
  cancel        Cancel a job
  create        Create DB Pool from resource
  delete        Delete volume, pool or job
  disable       Disable a job, attributes batch process
  enable        Enable a job, attributes batch process
  estimate      Performs FileSet estimate, listing gives full listing
  exit          Terminate Bconsole session
  gui           Non-interactive gui mode
  help          Print help on specific command
  label         Label a tape
  list          List objects from catalog
  llist         Full or long list like list command
  messages      Display pending messages
  memory        Print current memory usage
  mount         Mount storage
  prune         Prune expired records from catalog
  purge         Purge records from catalog
  quit          Terminate Bconsole session
  query         Query catalog
  restore       Restore files
  relabel       Relabel a tape
  release       Release storage
  reload        Reload conf file
  run           Run a job
  restart       Restart a job
  resume        Resume a job
  status        Report status
  stop          Stop a job
  setdebug      Sets debug level
  setbandwidth  Sets bandwidth
  snapshot      Handle snapshots
  setip         Sets new client address -- if authorized
  show          Show resource records
  sqlquery      Use SQL to query catalog
  time          Print current time
  trace         Turn on/off trace to file
  truncate      Truncate one or more Volumes
  unmount       Unmount storage
  umount        Umount - for old-time Unix guys, see unmount
  update        Update volume, pool or stats
  use           Use catalog xxx
  var           Does variable expansion
  version       Print Director version
  wait          Wait until no jobs are running

When at a prompt, entering a period cancels the command.
백업을 수행해보자. 위 bacula director 설정을 보면 설정되어 있는 job은 5개 이다. * bacula - backup - /etc * bacula - backup - /var/lib/bacula/bacula.sql * client1 - backup - /etc * client2 - backup - /etc * bacula - restore - /var/bacula-restores
run command 를 이용하여 아래 client1 서버에 백업 ᅟjob을 실행하였다. job을 선택하고 설정된 정보들을 확인한 후 ᅟ백업을 진행한다.
*run
A job name must be specified.
The defined Job resources are:
     1: bacula
     2: client1
     3: client2
     4: BackupCatalog
     5: RestoreFiles
Select Job resource (1-5): 2
Run Backup job
JobName:  client1
Level:    Full
Client:   client1-fd
FileSet:  Full Set
Pool:     File (From Job resource)
Storage:  File1 (From Job resource)
When:     2017-06-30 21:30:34
Priority: 10
OK to run? (yes/mod/no): yes
Job queued. JobId=47
백업이 진행되고 진행 상황을 확인해보는 방법은 2가지이다. status command 를 이용하면 Director 서비스의 상태를 확인 할 수 있는데 수행한 job 의 상태를 살펴보자.
*status dir
Running Jobs:
Console connected at 04-Jul-17 02:26
 JobId  Type Level     Files     Bytes  Name              Status
======================================================================
    73  Back Full          0         0  client1           is running
====
messages command 를 이용하면 수행되는 작업에 대한 메시지를 확인할 수 있다. autodisplay on 을 입력하면 엔터키를 입력할때마다 추가적으로 진행되는 메시지를 자동으로 보여준다.
*messages
30-Jun 21:30 bacula-dir JobId 47: Start Backup JobId 47, Job=client1.2017-06-30_21.30.36_09
30-Jun 21:30 bacula-dir JobId 47: Using Device "FileChgr1-Dev1" to write.
30-Jun 21:30 bacula-sd JobId 47: Volume "Vol-0016" previously written, moving to end of data.
30-Jun 21:30 bacula-sd JobId 47: Ready to append to end of Volume "Vol-0016" size=2,737,538
30-Jun 21:30 bacula-sd JobId 47: Elapsed time=00:00:01, Transfer rate=1.048 M Bytes/second
30-Jun 21:30 bacula-sd JobId 47: Sending spooled attrs to the Director. Despooling 117,536 bytes ...
30-Jun 21:30 bacula-dir JobId 47: Bacula bacula-dir 7.4.4 (202Sep16):
  Build OS:               x86_64-pc-linux-gnu debian 9.0
  JobId:                         47
  Job:                    client1.2017-06-30_21.30.36_09
  Backup Level:           Full
  Client:                 "client1-fd" 7.4.4 (202Sep16) x86_64-pc-linux-gnu,debian,9.0
  FileSet:                "Full Set" 2017-06-30 18:31:05
  Pool:                   "File" (From Job resource)
  Catalog:                "MyCatalog" (From Client resource)
  Storage:                "File1" (From Job resource)
  Scheduled time:         30-Jun-2017 21:30:34
  Start time:             30-Jun-2017 21:30:38
  End time:               30-Jun-2017 21:30:39
  Elapsed time:           1 sec
  Priority:               10
  FD Files Written:       509
  SD Files Written:       509
  FD Bytes Written:       994,569 (994.5 KB)
  SD Bytes Written:       1,048,682 (1.048 MB)
  Rate:                   994.6 KB/s
  Software Compression:   None
  Snapshot/VSS:           no
  Encryption:             no
  Accurate:               no
  Volume name(s):         Vol-0016
  Volume Session Id:      3
  Volume Session Time:    1498815750
  Last Volume Bytes:      3,799,870 (3.799 MB)
  Non-fatal FD errors:    0
  SD Errors:              0
  FD termination status:  OK
  SD termination status:  OK
  Termination:            Backup OK

30-Jun 21:30 bacula-dir JobId 47: Begin pruning Jobs older than 6 months .
30-Jun 21:30 bacula-dir JobId 47: No Jobs found to prune.
30-Jun 21:30 bacula-dir JobId 47: Begin pruning Files.
30-Jun 21:30 bacula-dir JobId 47: No Files found to prune.
30-Jun 21:30 bacula-dir JobId 47: End auto prune.
백업이 정상적으로 성공하였고 위 백업된 볼륨을 이용하여 복원을 시험한다. 가장 최근 진행한 백업을 선택하여 복원하는 방법으로 진행하였다. 복원 과정은 restrore 명령을 수행 후 원하는 item을 선택한다.
*restore
Using Catalog "MyCatalog"

First you select one or more JobIds that contain files
to be restored. You will be presented several methods
of specifying the JobIds. Then you will be allowed to
select which files from those JobIds are to be restored.

To select the JobIds, you have the following choices:
     1: List last 20 Jobs run # 마지막 20개 작업 나열
     2: List Jobs where a given File is saved # 파일이 백업된 장소로 작업 나열
     3: Enter list of comma separated JobIds to select # 작업별 ID 번호를 콤마 기호로 나열하여 입력
     4: Enter SQL list command # SQL 쿼리를 사용한 목록 나열
     5: Select the most recent backup for a client # 클라이언트의 가장 최근 작업을 선택
     6: Select backup for a client before a specified time # 클라이언트의 특정 시간대 이전 작업 선택
     7: Enter a list of files to restore # 복원할 파일명을 직접 입력
     8: Enter a list of files to restore before a specified time # 특정시간대에 이전한 백업된 파일 중 복원할 파일명을 직접 입력
     9: Find the JobIds of the most recent backup for a client # 클라이언트의 가장 최근 백업 ID 찾기
    10: Find the JobIds for a backup for a client before a specified time # 특정 시간대 이전 클라이언트의 가장 최근 백업 ID 찾기
    11: Enter a list of directories to restore for found JobIds # 특정 백업 ID에 백업된 디렉토리명 입력
    12: Select full restore to a specified Job date # 특정 일자로 전체 복원
    13: Cancel # 취소
아래의 경우 가장 최근 진행한 백업을 이용하여 복원하는 과정이며 위에서 진행하였던 client1 클라이언트에 최근 백업본을 복원하는 과정이다. 복원을 원하는 job을 선택하게 되면 ‘ls’ 와 같은 일반 리눅스 명령이 가능하여 디렉토리 이동 및 파일 목록을 확인 할 수 있다.
복원을 원하는 디렉토리 혹은 파일을 mark 명령으로 지정하게 되면 해당 디렉토리 혹은 파일이 복원할 준비가 되고 done 명령을 수행하면 복원할 내용을 확인 할 수 있다. 내용을 확인하고 문제가 없다면 그대로 복원이 진행된다. 클라이언트에 접속하여 복원이 잘 되었는지 확인한다.
Select item:  (1-13): 5
Defined Clients:
     1: bacula-fd
     2: client1-fd
     3: client2-fd
Select the Client (1-3): 2
Automatically selected FileSet: Full Set
+-------+-------+----------+----------+---------------------+------------+
| jobid | level | jobfiles | jobbytes | starttime           | volumename |
+-------+-------+----------+----------+---------------------+------------+
|    47 | F     |      509 |  994,569 | 2017-06-30 21:30:38 | Vol-0016   |
+-------+-------+----------+----------+---------------------+------------+
You have selected the following JobId: 47

Building directory tree for JobId(s) 47 ...  ++++++++++++++++++++++++++++++++++++++
428 files inserted into the tree.

You are now entering file selection mode where you add (mark) and
remove (unmark) files to be restored. No files are initially added, unless
you used the "all" keyword on the command line.
Enter "done" to leave this mode.

cwd is: /
$ ls
etc/
cd etc
cwd is: /etc/
$ ls
.pwd.lock
X11/
adduser.conf
adjtime
alternatives/
...
vim/
wgetrc
xdg/
$ cd ..
cwd is: /
$ ls
etc/
$ mark etc
509 files marked.

Invalid command "".  Enter "done" to exit.
$ done
Bootstrap records written to /var/lib/bacula/bacula-dir.restore.1.bsr
Bootstrap records written to /var/lib/bacula/bacula-dir.restore.1.bsr

The Job will require the following (*=>InChanger):
   Volume(s)                 Storage(s)                SD Device(s)
===========================================================================

    Vol-0016                  File1                     FileChgr1

Volumes marked with "*" are in the Autochanger.

509 files selected to be restored.

Run Restore job
JobName:         RestoreFiles
Bootstrap:       /var/lib/bacula/bacula-dir.restore.1.bsr
Where:           /var/bacula-restores
Replace:         Always
FileSet:         Full Set
Backup Client:   client1-fd
Restore Client:  client1-fd
Storage:         File1
When:            2017-06-30 21:46:37
Catalog:         MyCatalog
Priority:        10
Plugin Options:
OK to run? (yes/mod/no): yes
Job queued. JobId=48
*
You have messages.
*messages
30-Jun 21:46 bacula-dir JobId 48: Start Restore Job RestoreFiles.2017-06-30_21.46.39_10
30-Jun 21:46 bacula-dir JobId 48: Using Device "FileChgr1-Dev1" to read.
30-Jun 21:46 bacula-sd JobId 48: Ready to read from volume "Vol-0016" on file device "FileChgr1-Dev1" (/backup/file1).
30-Jun 21:46 bacula-sd JobId 48: Forward spacing Volume "Vol-0016" to file:block 0:2737538.
30-Jun 21:46 bacula-sd JobId 48: End of Volume at file 0 on device "FileChgr1-Dev1" (/backup/file1), Volume "Vol-0016"
30-Jun 21:46 bacula-sd JobId 48: End of all volumes.
30-Jun 21:46 bacula-sd JobId 48: Elapsed time=00:00:01, Transfer rate=1.048 M Bytes/second
30-Jun 21:46 bacula-dir JobId 48: Bacula bacula-dir 7.4.4 (202Sep16):
  Build OS:               x86_64-pc-linux-gnu debian 9.0
  JobId:                  48
  Job:                    RestoreFiles.2017-06-30_21.46.39_10
  Restore Client:         client1-fd
  Start time:             30-Jun-2017 21:46:41
  End time:               30-Jun-2017 21:46:41
  Files Expected:         509
  Files Restored:         509
  Bytes Restored:         994,569
  Rate:                   0.0 KB/s
  FD Errors:              0
  FD termination status:  OK
  SD termination status:  OK
  Termination:            Restore OK

30-Jun 21:46 bacula-dir JobId 48: Begin pruning Jobs older than 6 months .
30-Jun 21:46 bacula-dir JobId 48: No Jobs found to prune.
30-Jun 21:46 bacula-dir JobId 48: Begin pruning Files.
30-Jun 21:46 bacula-dir JobId 48: No Files found to prune.
30-Jun 21:46 bacula-dir JobId 48: End auto prune.
복원이 성공하였다면 복원한 Client 서버에 접속하여 복원된 파일이 문제가 없는지 점검한다.
# cd /var/bacula-resotres
# ls
total 12
drwxr-xr-x  3 root root 4096 Jun 30 21:46 .
drwxr-xr-x 12 root root 4096 Jun 30 21:46 ..
drwxr-xr-x 62 root root 4096 Jun 30 15:16 etc
# pwd
/var/bacula-restores/etc
Bacula Web
Bacula web 은 Bacula 에서 수행한 작업의 상태, 작업 로그, 백업 레포트 등등 다양한 정보를 제공하는 PHP 웹 기반 모니터링 도구이다. Bacula web 은 GPL v 2.0 license 무료로 사용 가능하고 가장 큰 장점은 설치가 쉽고 구성이 쉽다. 디자인 완성도는 개인적으로 부족하다고 느끼지만 직관적인 인터페이스를 가지고 있어 백업 모니터링 도구의 역할로써는 매우 훌륭하다고 생각한다.
Bacula web ᅟ의 기능을 간략하게 소개한다.
- 작업 보고서 페이지 제공
- Dashboard 제공
- 클라이언트 백업 레포트 기능
- 백업 작업 레포트 기능
- Pool 및 Voulme 레포트 기능
- 작업 로그 확인 가능
- 필터 및 옵션 설정 가능
Install Bacula Web
Director 서비스가 구동되는 bacula server(debian stretch) 에서 설치를 진행하였다. 당연한 이야기지만 bacual web 을 설치하기 전 bacula server 구성이 완료되어야 정상적으로 설치가 가능하다는 것을 참고하자.
ᅟInstsall Nginx and PHP
Bacual web 은 php 로 개발되어 웹 서버와 php 를 설치해야 한다. apt 를 이용하여 nginx, php-fpm 과 관련 패키지를 설치한다.
# apt update
# apt install nginx apache2-utils php-fpm php-pgsql php-gd
Configure PHP-FPM
php 의 timezone 설정을 한다. ᅟdate.timezone 문구를 찾아 아래와 같이 수정한다.
# vi /etc/php/7.0/fpm/php.ini
...
- ;date.timezone =
+ date.timezone = Asia/Seoul
php-fpm 서비스를 재시작한다.
# systemctl restart php7.0-fpm
Configure Nginx
웹 서버로 사용할 ᅟnginx 설정을 한다. bacula web 을 개인적으로 매우 훌륭하다고 하였지만 아쉬운 부분이자 단점인 로그인 기능이 없다. 그래서 apache 의 웹 인증을 적용하기로 하였다. htpasswd 를 이용하여 bacula web 페이지에 접속시 admin 계정으로만 접근이 가능하도록 설정한다.
# htpasswd -c /etc/nginx/htpasswd.users admin
New password:
Re-type new password:
Adding password for user admin
이제 nginx 의 사이트 설정을 한다. default configuration 파일을 수정한다. 접속할 ip 또는 도메인 정보를 server_name 항목에 입력하고 웹소스 경로를 설정한다. 추가로 php 와 htpasswd 설정을 추가한다.
# vi /etc/nginx/sites-available/default
...
server {
    listen 80 default_server;
    listen [::]:80 default_server ipv6only=on;

    root /var/www/bacula-web;
    index index.php index.html index.htm;

    server_name 192.168.0.190;

    auth_basic "Backup Monitoring";
    auth_basic_user_file /etc/nginx/htpasswd.users;

    location / {
        try_files $uri $uri/ =404;
    }

    error_page 404 /404.html;
    error_page 500 502 503 504 /50x.html;
    location = /50x.html {
        root /usr/share/nginx/html;
    }

    location ~ \.php$ {
        try_files $uri =404;
        fastcgi_split_path_info ^(.+\.php)(/.+)$;
        fastcgi_pass unix:/run/php/php7.0-fpm.sock;
        fastcgi_index index.php;
        fastcgi_param SCRIPT_FILENAME $document_root$fastcgi_script_name;
        include fastcgi_params;
    }
}
Download and Configure Bacula Web
nginx 에 설정한 웹소스 경로에 bacula web 압축 파일을 다운받아 해당 경로로 압축을 푼다. 현재 최신 버전은 7.4.0 이다.
# cd /opt
# wget --content-disposition http://www.bacula-web.org/download.html?file=files/bacula-web.org/downloads/7.4.0/bacula-web-7.4.0.tgz
# mkdir /var/www/bacula-web
# tar xvfz bacula-web-7.4.0.tgz -C /var/www/bacula-web
압축을 풀었다면 소스 디렉토리로 이동하여 설정을 진행한다. config.php.sample 파일을 복사 후 bacula catalog 정보에 맞게 정보를 수정한다.
# cd /var/www/bacula-web
# cd application/config
# cp config.php.sample config.php
# vi config.php
...
// PostgreSQL bacula catalog
$config[0]['label'] = 'Bacula Server';
$config[0]['host'] = 'localhost';
$config[0]['login'] = 'bacula';
$config[0]['password'] = 'vmffpdlsxprtmxm1!';
$config[0]['db_name'] = 'bacula';
$config[0]['db_type'] = 'pgsql';
$config[0]['db_port'] = '5432';
웹소스 경로의 소유권을 nginx 를 구동하는 www-data 로 변경한다.
# chown -R www-data /var/www/bacula-web
Access Bacula Web
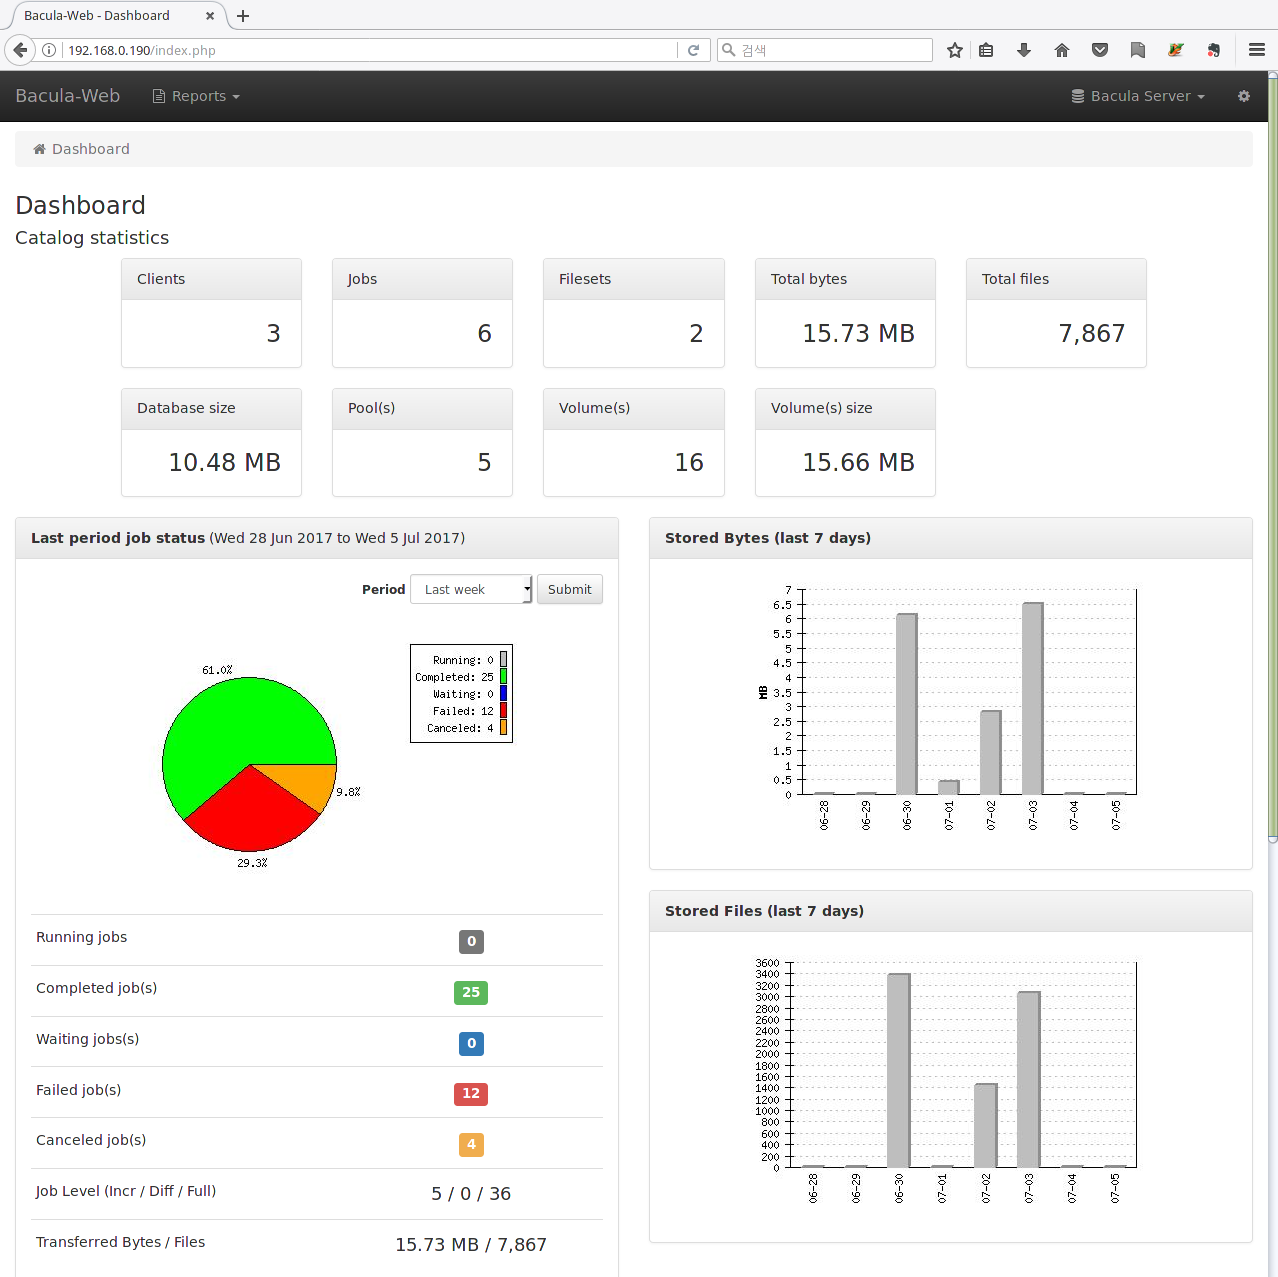
위 순서로 설치를 마치고 이제 브라우저에서 bacula web 으로 접속해본다. nginx 에서 설정한 도메인 또는 IP 로 접속한다. 웹 인증 창이 뜨고 인증에 성공하면 아래와 같이 bacula web 페이지를 확인 할 수 있다.

Bacula Report
Bacula 에서는 messages 기능을 이용하여 job 마다 메일로 레포트를 받을 수 있다. 하지ᅟ만 job에 개수만큼 메일을 수신 받다보니 비효율적으로 관리가 될 수 있다. 찾아보니 서드 파티로 perl 스크립트를 이용하여 정해진 기간내에 수행된 백업 결과를 정리된 표형식으로 받을 수 있다.
Install Bacula Report
설치는 매우 간단하다. 소스가 github 에 공개되어 있고 INSTALL 파일에 설치 및 ᅟ설정 방법에 대하여 자세하게 나와있다. git 을 이용하여 소스를 다운받는다.
# cd /etc/bacula/scripts
# git clone https://github.com/davidegiunchi/send-bacula-backup-report.git
# cd send-bacula-backup-report
# less INSTALL
Settings Bacula Report
INSTALL 파일을 보면 상세하게 설정 방법이 나와있다. 정상적으로 이 스크립트를 이용하기 위해서는 bacula 서버가 ᅟ운영되고 있어야 하고 db 는 mysql 또는 postgresql 을 사용해야 한다. 추가로 로컬 서버에 ᅟmta 설치 및 구성이 되어있어야 한다. perl 스크립트를 사용하기에 perl 모듈을 설치한다.
# apt update
# apt install -y libhtml-template-perl libmime-lite-perl
If you have a MySQL db:
# apt install -y libdbd-mysql-perl
If you have a PostgreSQL db:
# apt install -y libdbd-pg-perl
설정 파일을 복사하고 권한을 수정한다.
# cp send_bacula_backup_report.pl /etc/bacula/scripts/
# cp send_bacula_backup_report.conf.example /etc/bacula/send_bacula_backup_report.conf
# cp send_bacula_backup_report.tpl /etc/bacula/
# chmod 750 /etc/bacula/scripts/send_bacula_backup_report.pl
# chmod 640 /etc/bacula/send_bacula_backup_report.conf
설정 파일을 수정한다. db type(데이터베이스 타입), db password(데이터베이스 패스워드), email_from(받는 이메일 주소), email_to(보내는 이메일 주소) bacula web 이 설치되어 있다면 웹 경로의 도메인을 수정한다. 이 역할은 메일에서 각 job 의 상태를 클릭하게 되면 해당 bacula web 페이지로 이동하여 정보를 확인할 수 있게 된다.
# vi /etc/bacula/send_bacula_backup_report.conf
...
# mysql or Pg
- $db_type='mysql';
+ $db_type='Pg';
# other db parameters
$db_host='localhost';
$db_name='bacula';
- $db_username='root';
+ $db_username='bacula';
- $db_password='xxxxxxxx';
+ $db_password='vmffpdlsxprtmxm1!';
# url to bweb.pl or your bacula's web interface. If you don't have a web interface, you can skip it
- $bweb_path='http://hostname.or.ip.of.the.bacula.dir/';
+ $bweb_path='http://backup.iorchard.co.kr';
# email arguments
- $email_from='[email protected]';
+ $email_from='[email protected]';
- $email_to='[email protected]';
+ $email_to='[email protected]';
$email_subject="Backup report of $mday/$mon/$year";

$template_file='/etc/bacula/send_bacula_backup_report.tpl';
postgresql 을 사용한다면 아래 작업을 추가해줘야 한다.
# su postgresql
$ psql bacula < ./functions-postgresql.sql
설정은 끝났고 정상적으로 잘 발송이 되어지는지 시험해본다. 뒤에 숫자는 하루동안 수행된 job 에 대한 정보를 취합하겠다는 인수이다. ‘2’ 는 2일, ‘3’ 는 3일이 된다.
# /etc/bacula/scripts/send_bacula_backup_report.pl 1
정상적으로 스크립트가 수행되었다면 아래와 같이 한눈에 ᅟ보기 쉬운 백업 레포트를 메일로 받을 수 있다. 위에서 설명한 바와 같이 상태 값을 클릭하게 되면 bacual web 모니터링 페이지로 이동한다.

crontab 설정에 위 스크립트를 스케쥴에 맞게 레포트가 발송 될 수 있도록 예약 작업을 추가한다. 아래 기본 예제는 ᅟ1일 레포트를 월요일부터 목요일까지 매일 받고 일요일날 3일 레포트를 받도록 설정하였다. 기본 예제이지만 풀백업은 시간이 더 소요되므로 금요일날 풀백업을 진행하여 일요일날 레포트를 받고 월요일에서 목요일은 증분백업을 진행하여 하루마다 레포트를 받는 것으로 아래와 같이 설정할 수 있다.
# crontab -e
...
# send daily bacula backup report
0 9    * * 2-5 root    /etc/bacula/scripts/send_bacula_backup_report.pl 1 >/dev/null
0 9    * * 1   root    /etc/bacula/scripts/send_bacula_backup_report.pl 3 >/dev/null